The BLACK X xPad enhances your smart lock experience, providing quick and secure access. If you encounter any issues during installation, pairing, or installing, this guide will help you resolve them efficiently.
For a detailed step-by-step installation guide and tutorial, refer to:
Now, let’s get your BLACK X xPad working properly!
Setup & Installation Issues
The xPad does not power on
Here are several options that can be examined:
Ensure that the batteries are inserted correctly with the correct polarity.
If no beep sound is heard, replace the AAA batteries with a new set and try again.
The back cover is difficult to remove
Here are several options that can be examined:
Use the Keypad ejector tool provided in the package to insert into the designated hole at the bottom of the xPad.
Apply gentle but firm pressure to release the back cover without forcing it.
Pairing & Connectivity Issues
The xPad is not pairing with the BLACK X App
Here are several options that can be examined:
Make sure Bluetooth is turned on in your mobile device settings during the pairing process.
Activating Pairing Mode:
Open the BLACK X App and navigate to the lock you want to pair the xPad with.
In the Settings menu, select Keypad > Add Keypad, then proceed with the pairing process.
Locate the Pairing Key in the small hole above the battery compartment. Use the Keypad ejector tool to press the Pairing Key button until the xPad starts flashing.
Ensure the xPad is within Bluetooth range of the lock while pairing.
If pairing fails, restart the BLACK X App and try again.
For all the above steps, 🔗refer to Step 4in the installation guide for detailed instructions.
The Smart lock doesn’t respond to the xPad
Here are several options that can be examined:
Ensure the xPad is successfully paired with the BLACK X App and the smart lock. 🔗 Refer to Step 4
Check if the batteries are properly installed and have sufficient charge. If needed, replace them with new AAA batteries. 🔗 Refer to Step 3
Verify that the xPad is within Bluetooth range of the lock (maximum 10 feet / 3 meters for standard doors, closer for steel doors). 🔗 Refer to Step 5
Restart the BLACK X App and try unlocking the door again.
If the issue persists, remove the xPad from the app and re-pair it. 🔗 Refer to Step 4
Battery Replacement
How to replace the batteries in the xPad
If your xPad is not responding or the battery is low, follow these steps to replace the AAA batteries correctly:
Remove the back cover: Use the Keypad ejector tool to remove the back cover of the xPad by inserting the pin into the designated hole at the bottom of the device. Apply gentle pressure to release the back cover.
Remove the old batteries: Open the battery compartment cover and remove the old batteries.
Insert new batteries:
Ensure the positive (+) and negative (-) terminals match the markings inside the compartment.
Insert the batteries firmly into place.
Confirm power-up:
The xPad will emit a beep to confirm the batteries have been installed correctly.
If no sound is heard, double-check the polarity and ensure the batteries are properly seated.
Secure the back cover: Align the cover with the xPad and press on the cover until it clicks.
Need Further Assistance?
If you’re still experiencing issues after following this guide, our support team is here to help.
✉️ Contact us: Reach out for support and we’ll respond as soon as possible.🔗 contact here
Euro Profile Smart Lock – Knob Replacement
For your convenience, an alternative handle option is included.
If you prefer a different grip style, follow these steps:
Remove the existing knob: Use the provided Allen key to loosen the knob by inserting it into the designated hole on top of the knob and turning it until the knob is fully released.
Install the new knob: Position the replacement knob and secure it by tightening it with the Allen key.
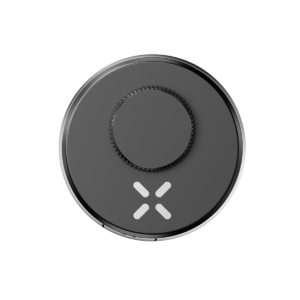
Select the appropriate knob:
Use the gear knob for the knob on the BLACK X device.
Use the oval grip knob for the cylinder side.
🎥 Looking for a clearer walkthrough? Watch our step-by-step video tutorials below!
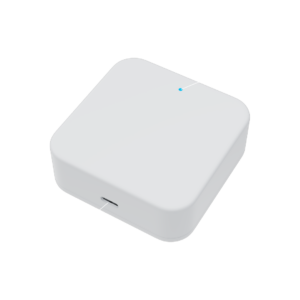
Troubleshooting Guide for BLACK X Wi-Fi Bridge
Experiencing issues with your BLACK X Wi-Fi Bridge? This guide will help you troubleshoot common problems related to setup, connectivity, and remote access. Follow the steps below to ensure smooth operation.
For a detailed step-by-step installation guide and tutorial, refer to:
Now, let’s get your BLACK X Wi-Fi Bridge working properly!
Setup & Installation Issues
Wi-Fi Bridge does not power on
Here are several options that can be examined:
Ensure the Type-C USB cable is properly connected to the Wi-Fi Bridge and plugged into a power source. 🔗Refer to Step 3
Note that a USB power socket plug is not included. You must use a compatible USB power adapter. 🔗Refer to Step 1
Try plugging the bridge into a different power outlet to rule out power source issues.
Understanding light indicators on the Wi-Fi Bridge
Red & blue light flashing: Standby mode, ready to pair.
Red light only: Network failure or timeout.
Blue light flashing: Pairing in progress or successfully activated.
Pairing & Connectivity Issues
The Wi-Fi Bridge is not pairing with the BLACK X App
Here are several options that can be examined:
Make sure the Wi-Fi Bridge is in pairing mode—the indicator light should flash red and blue. 🔗Refer to Step 2
If the indicator flashes red, unplug the Wi-Fi Bridge, wait for the lights to turn off completely, and reconnect it. 🔗 Refer to Step 3
Ensure your smartphone’s Bluetooth is turned on before attempting to pair again.
The Wi-Fi Bridge does not connect to the home Wi-Fi network
Here are several options that can be examined:
Ensure you select a Wi-Fi network that supports 2.4 GHz, as 5 GHz networks are not compatible.
Double-check that the Wi-Fi password is entered correctly in the app.
Keep the Wi-Fi Bridge within 7 meters of your router for the best connection.
If the app displays “Initialization Failed”, restart your router and attempt the connection process again.
If the indicator flashes red, unplug the Wi-Fi Bridge, wait for the lights to turn off completely, and then reconnect it to reset the pairing mode.
For all the above steps, 🔗refer to Steps 3 and 4in the installation guide for detailed instructions.
Remote Access Issues
The smart lock does not respond to remote commands
Here are several options that can be examined:
Ensure that the Wi-Fi Bridge is powered on and properly connected to your home Wi-Fi network.
Verify that the Wi-Fi Bridge is within range of your BLACK X smart lock.
Check the Wi-Fi connection indicator in the BLACK X App on the home page of your smart lock. The lock is not properly connected to the bridge if it is not green.
Confirm that remote access is activated in the BLACK X App: Open the app, go to your BLACK X lock settings ⚙️, and click “Lock Remotely” > “Activate”.
Test remote functionality by stepping outside your home Wi-Fi range and using the BLACK X App to unlock your door.
For all the above steps, 🔗refer to Step 5 in the installation guide for detailed instructions.
Need Further Assistance?
If you’re still experiencing issues after following this guide, our support team is here to help.
✉️ Contact us: Reach out for support and we’ll respond as soon as possible.🔗 contact here.
General Troubleshooting & Resetting the Wi-Fi Bridge
The indicator light on the Wi-Fi Bridge stays red
Here are several options that can be examined:
A red light indicates a network failure or timeout. To reset the pairing mode, unplug the Wi-Fi Bridge, wait for the lights to turn off completely, and reconnect it. 🔗Refer to Step 2
If the issue persists, restart your router and attempt to reconnect the bridge to the network 🔗Refer to Step 4
Need Further Assistance?
If you’re still experiencing issues after following this guide, our support team is here to help.
✉️ Contact us: Reach out for support and we’ll respond as soon as possible.🔗 contact here
How to install WI-FI Bridge – Step by step
The BLACK X Wi-Fi Bridge enhances your smart lock by enabling remote access and control. This guide will walk you through the installation process to ensure a seamless setup.
By following these step-by-step instructions, you’ll have your Wi-Fi Bridge up and running in no time. Let’s get started!
Step 1: Unbox and Prepare Components
Included in the Box
– BLACK X Wi-Fi Bridge
– Type-C USB Cable
– Quick Start Guide
Preparation
Ensure you have access to a stable power socket near your Wi-Fi router.
Confirm that you have already downloaded and set up the BLACK X App on your smartphone as part of the smart lock installation process.
Note: A USB power socket plug is not included with the Wi-Fi Bridge. You will need to purchase a compatible USB power socket plug separately to connect the bridge to a power outlet.
Step 2: Understand the Light Indicators on the Wi-Fi Bridge
Red and blue: Standby mode; ready to pair.
Red: Network failure or timeout
Blue: Pairing in progress or activated mode.
Troubleshooting:
If the indicator flashes red, unplug the Wi-Fi Bridge, wait for the lights to turn off completely, and then reconnect it to reset the pairing mode.
Step 3: Pair and activate the Wi-Fi Bridge on the BLACK X App
Open the BLACK X App on your smartphone.
Go to the menu and select “Bridges.”
Connect the Type-C USB cable to the Wi-Fi Bridge and plug it into a power source using the compatible USB power socket plug. The bridge will power on and the indicator will flash red and blue.
In the app, press the “+” button and select the relevant Wi-Fi bridge.
Follow the prompts to pair your Wi-Fi Bridge. When the indicator starts flashing blue, the pairing process is in progress.
Troubleshooting:
If the indicator flashes red, unplug the Wi-Fi Bridge, wait for the lights to turn off completely, and then reconnect it to reset the pairing mode.
Step 4: Connect the Wi-Fi Bridge to Your Home Wi-Fi
In the app, select “Wi-Fi Name” and choose your home Wi-Fi network.
Note: Please ensure you choose a Wi-Fi network that supports 2.4 GHz.
Enter your Wi-Fi password and confirm.
Assign a name to your Wi-Fi Bridge in the app and press “OK”. Once connected, the indicator light will flash blue every 1-2 seconds.
Troubleshooting:
If the app displays “Initialization Failed,” double-check your Wi-Fi password and ensure the Wi-Fi Bridge is within a 7-meter range of your router.
Step 5: Approve remote activation and test Your Wi-Fi Bridge
Open the BLACK X App on your smartphone.
Enter the setting of your BLACK X lock⚙️. click on “Lock remotely” and choose “activate”.
Move out of the range of your home Wi-Fi network (e.g., step outside so you are out of your Wi-Fi range).
Use the BLACK X App to remotely unlock your smart lock.
Congratulations! You have successfully installed your Wi-Fi Bridge.
Troubleshooting:
If the lock does not respond:
Ensure the Wi-Fi Bridge is powered on and properly connected to your Wi-Fi network.
Verify that the Wi-Fi Bridge is within range of your lock.
Check the green Wi-Fi connection indicator in the app (displayed on the home page of your BLACK X smart lock) to confirm the lock is connected to the Wi-Fi.
If the issue persists, revisit the setup process and repeat the pairing steps as needed.
🎥 Looking for a clearer walkthrough? Watch our step-by-step video tutorials below!
Troubleshooting Guide for BLACK X Euro Profile Smart Lock
Having trouble with your BLACK X Euro Profile Smart Lock? Don’t worry! This guide covers common malfunctions and provides step-by-step solutions to help you resolve any issues quickly and efficiently. Whether it’s installation difficulties, connectivity problems, or battery concerns, we’ve got you covered.
For a seamless experience, follow the troubleshooting section below to identify your issue and apply the recommended fix. If the problem persists, feel free to contact our support team for further assistance.
Ensure the mortise plate screw securing the cylinder has been fully removed. Refer to Learn more:📄
Insert the key and rotate it slightly to align the cam with the body of the cylinder.Learn more: 📄
If there is resistance, double-check the cam alignment and try again. Learn more: 📄
The new cylinder does not sit flush with the door
Here are several options that can be examined:
Ensure the cylinder is inserted correctly and fully positioned in the door.
Secure the cylinder using the provided M5 screw.
The cylinder should not protrude more than 3 mm from the door surface. If it does, adjust the installation and ensure the safety furniture is properly placed to prevent tampering
Avoid over-tightening the lock screw, as this may cause alignment issues.
For detailed instructions on all the above steps, refer to Step 5 in the installation guide 📄
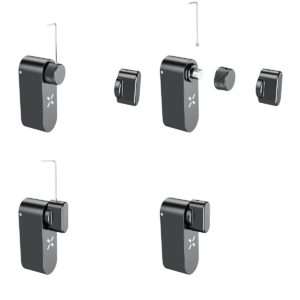
The BLACK X device feels loose after installation
Here are several options that can be examined:
Ensure the BLACK X device is fully aligned and twisted into place until a ‘click’ sound is heard.
Use the Allen key to partially tighten the screws on the left and right sides, allowing for proper adjustment.
Align the external knob properly before tightening the screw on top.
Once all components are correctly positioned, fully secure the device by tightening the screws on both sides.
For detailed instructions on all the above steps, refer to Step 9 in the installation guide 📄
The Allen key is turning without tightening the external knob
Here are several options that can be examined:
Recheck the position of the external knob on the knob body. Learn more:📄
Ensure they align properly and that you can see a complete hole for the Allen key to engage.
If necessary, apply more pressure to mount the external knob until the two holes are fully aligned.
Lock Functionality Issues
The opening mechanism is stuck
Here are several options that can be examined:
Ensure the new cylinder was correctly aligned with Cam 1 and Knob Housing 2 during preparation. Learn more: 📄
When tightening the lock screw, make sure the cylinder does not protrude more than 3 mm from the door surface. Avoid over-tightening to prevent damage. Learn more: 📄
While performing the final tightening of the lock screw, ensure the cylinder remains flush and does not exceed the 3 mm limit. Learn more: 📄
Recheck all the steps for attaching the BLACK X Device (installation guide 📄):
When mounting the BLACK X Device, listen for a ‘click’ to confirm it is correctly positioned. Also, ensure there is no looseness or play between the device and the cylinder.
Make sure to remove the plastic/silicone pin before mounting the device.
When securing the BLACK X Device, avoid overtightening, as this may cause the opening mechanism to become jammed.
The lock does not respond to app commands
Here are several options that can be examined:
Ensure that the lock is securely installed and the screws are tightened. Learn more:📄
If using a Wi-Fi bridge, check that it is connected and powered. Learn more:📄
Restart the BLACK X app and ensure Bluetooth is enabled.
Connectivity & App Issues
The lock does not pair with the BLACK X App
Here are several options that can be examined:
Open the BLACK X app and ensure you are in pairing mode. Learn more:📄
Use the Allen key to press the connect button on the lock. Learn more:📄
Confirm that the battery is installed correctly and that a beep sound was heard upon installation. Learn more:📄
Ensure Bluetooth is turned on in your mobile device settings before attempting to connect. Learn more:📄
Wait for the pop-up for the correct lock to appear and click “Connect”. Learn more:📄
If the lock does not appear, restart the app, ensure Bluetooth is enabled, and try again.
The Wi-Fi bridge is not connecting (if applicable)
Here are several options that can be examined:
Ensure the USB-C Wi-Fi bridge is plugged into a power source.
Check the Wi-Fi connection and make sure the router is within range.
Restart the Wi-Fi bridge and the BLACK X app, then attempt to reconnect.
What type of battery is required for BLACK X locks?
The BLACK X device requires a CR2 battery, commonly used in cameras and electronic devices. Learn more:📄
Battery life is up to 2 years under normal usage.
Where to Buy CR2 Batteries?
You can purchase CR2 batteries at various retailers, both online and in physical stores. Here are some options:
Online Retailers:
Amazon: Search for “CR2 battery,” and you’ll find many options from various brands.
eBay: You can find new or bulk options for CR2 batteries.
Walmart: They have an online store with delivery options or in-store pickup.
Physical Stores:
Electronics Stores: Stores like Best Buy often carry CR2 batteries.
Pharmacies: Chains like CVS or Walgreens sometimes stock batteries in their electronics section.
Home Improvement Stores: Places like Home Depot or Lowe’s usually have a selection of batteries.
Before purchasing, check the packaging for compatibility and read reviews to ensure you’re buying a reliable brand.
Need Further Assistance?
If you’re still experiencing issues after following this guide, our support team is here to help.
✉️ Contact us: Reach out for support and we’ll respond as soon as possible.🔗 Contact here
How to install Euro Profile Smart Lock – Step by step
BLACK X Smart locks provide enhanced security and convenience, allowing you to control access to your home or office with ease. Whether you’re upgrading an existing lock or installing a new one, this guide will walk you through the process of installing a Euro Profile Smart Lock efficiently and correctly.
By following these step-by-step instructions, you’ll ensure a secure and hassle-free installation. Let’s get started!
Step 1: Unbox and prepare components:
Open the packages and identify all components. Lay them out for easy access.
Hardware components:
1x BLACK X Euro Profile Smart Lock
1x Euro profile door cylinder
Box 1:
2x Emergency keys
1x CR2 3V battery
1x Allen key
1x Cylinder screw
Box 2:
1x Extra Grip External Knob
1x Extra Grip Internal Knob
Step 2: Removing the old cylinder:
Locate the Mortise Plate: Identify this plate on the door’s edge where the door meets the frame.
Unscrew the Cylinder: Locate the screw on the mortise plate that secures the cylinder. Use a suitable screwdriver to carefully unscrew and keep the screw safely for later use.
Step 3: Extracting the Cylinder:
Insert the Key: Fully insert the original key into the cylinder.
Align the Cam: Rotate the key to align the cam with the body of the cylinder, ensuring it can be removed.
Remove the Cylinder: With the cam properly aligned, gently pull the cylinder out from its housing.
Note: If you encounter resistance, recheck the cam alignment.
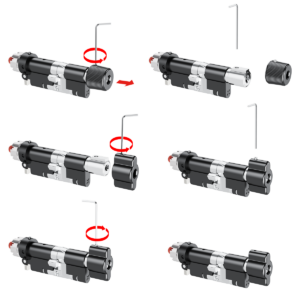
Step 4: Prepare for new cylinder installation
Disassemble the Knob: Use the provided Allen key to loosen and remove the screw securing the knob. Carefully detach the knob from its base.
Prepare the Cylinder: Ensure the new cylinder body is properly aligned with Cam 1 and Knob Housing 2. Rotate the cylinder as shown in the video to achieve the correct orientation for seamless integration into the lock mechanism.
Note: Incorrect alignment may prevent proper integration into the lock mechanism.
Step 5: Installing the New Cylinder:
Position the New Cylinder: Insert the new cylinder into its designated position in the door, ensuring proper alignment.
Secure the Cylinder: Use the provided M5 steel screw or the existing cylinder screw. Hand-tighten it first, then use a Phillips-head screwdriver for final tightening.
Note: Do not over-tighten to avoid damage.
Step 6: Identifying gear positioning:
The smart lock is installed on the inner side of the door.
Gear Positioning:
If installed on the right side, the gear should face green.
If installed on the left side, the gear should face red.
Flipping the Gear (if needed):
Remove the gear holder.
Flip the gear if necessary to match the correct indicator position.
Reattach the gear holder securely until final removal in Stage 10.
Note: The gear holder is a temporary support to prevent the gear from falling during installation. It will be removed in step 10.
Step 7: Installing the CR2 Battery
Use a flathead screwdriver to open the dual-function battery compartment cover. Turn it half a turn, then press down on the latch to release the compartment.
Insert the battery release tab into the lock, then place the CR2 battery into the BLACK X device, ensuring the positive (+) and negative (-) ends align with the symbols on the battery pull tab. A beep will confirm the device is operational.
Return the battery compartment cover to its original position with the tab facing outward from the lock. Use the flathead screwdriver to turn the screw back to its locked position.
Note: Ensure that the pull tab is fully inserted into the battery compartment.
Step 8: Pairing with the BLACK X App
Ensure your phone’s Bluetooth and Wi-Fi are enabled before attempting to pair.
Download BLACK X App from App store or google play.
Open the BLACK X App.
click on ‘install a new lock’.
Name Your Lock or choose a description.
Create a ‘Home’ to associate with your lock.
Choose the ‘Home’ for your lock.
While in “Discovering Nearby Locks” mode, use the Allen key to press the connect button on the BLACK X device.
When a pop-up for the correct lock appears, click “Connect” to proceed.
Congratulations! You’ve successfully connected your first lock.
Step 9: Attaching the BLACK X Device
Prepare for mounting: Before mounting the device, use the supplied Allen key to partially loosen the screws on both the left and right sides of the BLACK X device until they are no longer visible from the inside. This ensures proper positioning for installation.
Mounting the Device: Remove the gear holder, as it is no longer needed, and dispose of it. Carefully align and insert the BLACK X device onto the cylinder, twisting it until it securely locks in place. You should hear a ‘click’ when the device is properly positioned. Ensure there is no looseness or movement between the device and the cylinder.
Secure the Device: Use the supplied Allen key to partially tighten the screws on the left and right sides of the BLACK X device, ensuring it is loosely attached but still adjustable. Note: Avoid overtightening at this stage to allow proper alignment of all components.
Mount the external knob: Align the knob with the hole facing upward, then rotate the knob body until it aligns properly. Use the provided Allen key to tighten the screw on the top. Note: Ensure the knob is fully aligned with the holes; if not, the Allen key may turn without securing it properly.
Fully secure the device: Once the knob is correctly mounted, return to the screws on the left and right sides of the BLACK X device and firmly tighten them using the Allen key. Note: Exercise caution to avoid overtightening, as this may cause the opening mechanism to become jammed.
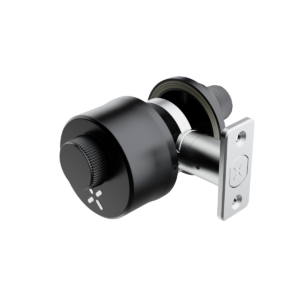
BLACK X USA Deadbolt Smart Lock Troubleshooting Guide: Fix Common Issues
Having trouble with your BLACK X USA Deadbolt Smart Lock? Don’t worry! This guide covers common malfunctions and provides step-by-step solutions to help you resolve any issues quickly and efficiently. Whether it’s installation difficulties, connectivity problems, or battery concerns, we’ve got you covered.
For a seamless experience, follow the troubleshooting section below to identify your issue and apply the recommended fix. If the problem persists, feel free to contact our support team for further assistance.
Use the Allen key to press the connect button on the lock. 🔗 Refer to Step 11
Confirm the battery is properly installed and that you heard a beep when inserted, indicating that the device is powered on and operational. 🔗Refer to Step 8
Make sure Bluetooth is turned on in your mobile device settings.
Wait for the pop-up for the correct lock to appear and click “Connect”. 🔗 Refer to Step 11
If the lock does not appear, restart the app, ensure Bluetooth is enabled, and try again.
The lock is not responding to app commands
Here are several options that can be examined:
Ensure the lock is securely installed and all screws are in place. 🔗 Refer to Step 9
If using a Wi-Fi bridge, confirm it’s connected and powered. 🔗Refer to Step 13
Restart the BLACK X app and ensure Bluetooth is enabled and active.
You can purchase CR2 batteries at various retailers, both online and in physical stores. Here are some options:
Online Retailers:
Amazon: Search for “CR2 battery,” and you’ll find many options from various brands.
eBay: You can find new or bulk options for CR2 batteries.
Walmart: They have an online store with delivery options or in-store pickup.
Physical Stores:
Electronics Stores: Stores like Best Buy often carry CR2 batteries.
Pharmacies: Chains like CVS or Walgreens sometimes stock batteries in their electronics section.
Home Improvement Stores: Places like Home Depot or Lowe’s usually have a selection of batteries.
Before purchasing, check the packaging for compatibility and read reviews to ensure you’re buying a reliable brand.
Need Further Assistance?
If you’re still experiencing issues after following this guide, our support team is here to help.
✉️ Contact us: Reach out for support and we’ll respond as soon as possible.🔗 contact here
How to install USA Deadbolt Smart Lock – Step by step
BLACK X Smart locks provide enhanced security and convenience, allowing you to control access to your home or office with ease. Whether you’re upgrading an existing lock or installing a new one, this guide will walk you through the process of installing a USA deadbolt smart lock efficiently and correctly.
By following these step-by-step instructions, you’ll ensure a secure and hassle-free installation. Let’s get started!
Step 1: Unbox and prepare components:
Open the packages and identify all components. Lay them out for easy access.
Hardware components:
1X BLACK X deadbolt
2X mechanical key
Box 1:
1x CR2 3V battery
1x Allen key
1x screwdriver
Box 2:
1 x Mounting Plate: 2.75″ x 1.13″ (7 mm x 28.7 mm)
1x bolt extension cover
4x M5 x 1″ (25mm) Screws
Step 2: loosen the screws
Use the provided Allen wrench and insert it into the screw socket as demonstrated in the video.
Turn the Allen wrench counterclockwise to loosen the screw.
Repeat the same process for the screw on the opposite side.
Step 3: disassemble the BLACK X mechanism
Rotate the BLACK X mechanism counterclockwise to loosen the body.
Carefully separate the mechanism body and the ratchet housing, as demonstrated in the illustration.
Step 4: Remove the Fasteners
Insert the screwdriver into the designated fastener slots.
Rotate the screwdriver to loosen and remove the fasteners from the component.
Once the fasteners are removed, gently detach the components, following the directions demonstrated in the video, to fully separate the lock for assembly preparation.
Step 5: Extracting the existing Cylinder:
Use a screwdriver to remove the screws that secure the existing cylinder in place.
Carefully pull the cylinder out of the mechanism.
Measure the distance from the center of the lock to the edge of the door.
Step 6: Determine the Correct Fit for the BLACK X Deadbolt
Choose the appropriate cylinder length based on your measurement from the previous step:
2.36” (60mm) Pre-set from the factory or 2.75” (70mm), Refer to the diagram for a clear comparison of the two sizes.
Refer to the diagram for a clear comparison of the two sizes.
Step 7: Install the Cylinder
Start with section 1 for the 2.75” (70mm) cylinder installation or Section 2 for the 2.36” (60mm) cylinder installation.
Insert the Allen key into the designated screw slot and pull the bolt sleeve outward to extend the cylinder length.
Use a screwdriver to rotate and pop the bolt face plate and bolt extension cover.
Loosen the bolt extension cover with the Allen key and carefully remove it.
Use a screwdriver to rotate and reinsert the base into its original position.
Use the screwdriver to slightly extract the metal pin outward to align it with the internal locking component, as shown in the illustration.
Slide the bolt component in the direction indicated in the illustration to ensure smooth movement.
Insert the cylinder into the lock housing on the door, aligning it with the holes.
Secure the cylinder by tightening the 2x M5 x 1” (25mm) screws.
Use a screwdriver to reattach the metal pin.
Rotate the bolt face plate back into position and pop the bolt extension cover.
Place the bolt extension cover back. Note: Select the appropriate size of the bolt extension based on the required lock length.
Tighten the bolt extension cover using the Allen key.
Step 8: Installing the CR2 battery
Use a flathead screwdriver to open the dual-function battery compartment cover. Turn the screw half a turn and press down on the latch to release the compartment.
Insert the battery release tab into the lock. Place the CR2 battery into the BLACK X device, ensuring the positive (+) and negative (-) ends align with the symbols on the battery pull tab. A beep will confirm the device is operational.
Return the battery compartment cover to its original position with the tab facing outward from the lock. Use the flathead screwdriver to turn the screw back to its locked position.
Step 9: Attaching the BLACK X Deadbolt Device
Insert the lock mechanism through the door.
Align the components with the corresponding holes on both sides of the door.
Slide the lock mechanism fully into place, ensuring it fits securely within the door structure.
Tighten the screws to secure the lock in place and ensure proper alignment and functionality.
Step 10: Identifying Door Orientation
The smart lock is installed on the inner side of the door.
Gear Positioning:
If installed on the right side, the gear should face green.
If installed on the left side, the gear should face red.
Flipping the Gear (if needed):
Flip the gear if necessary to match the correct indicator position.
Step 11: Pairing with the BLACK X App
Ensure your phone’s Bluetooth and Wi-Fi are enabled before attempting to pair.
Download BLACK X App from App store or google play.
Open the BLACK X App.
click on ‘install a new lock’.
Name Your Lock or choose a description.
Create a ‘Home’ to associate with your lock.
Choose the ‘Home’ for your lock.
While in “Discovering Nearby Locks” mode, use the Allen key to press the connect button on the BLACK X device.
When a pop-up for the correct lock appears, click “Connect” to proceed.
Congratulations! You’ve successfully connected your first lock.
Step 12: Final Assembly
Align the two parts of the lock assembly, as demonstrated in the illustration.
Rotate the assembly in the direction indicated by the red arrows to securely connect the components.
Once aligned, ensure the mechanism locks into place by rotating it slightly to confirm a tight fit.
Use the Allen key to rotate the screws clockwise and tighten them on both sides.