Follow these simple steps to set up your xPad+ quickly and efficiently. Ensure all components are ready before starting the installation process.
Step 1: Unbox and Prepare Components
Open the package and identify all components. Lay them out for easy access.
The package includes:
1 x xPad+
1 x 3M adhesive pad
1 x Keypad ejector tool
2 x Screws
2 x NFC Cards
2 x AAA Batteries
Step 2: Remove the Back Cover of the xPad+
Using the Keypad ejector tool, remove the back cover of the xPad+ by inserting the pin into the designated hole at the bottom of the device
Step 3: Place the batteries
Open the battery compartment cover.
Insert the batteries, ensuring they are correctly positioned. The xPad+ will power on and emit a beep to confirm proper installation.
Step 4: Pair the xPad+ with the BLACK X app
Open the BLACK X App, navigate to the lock you wish to pair with the xPad+, and tap the Settings button.
In the Settings menu, select Keypad, then tap Add Keypad.
On the xPad+, locate the Pairing Key in the small hole just above the battery compartment, where the batteries are installed. Use the Keypad ejector tool to press the Pairing Key button. The xPad+ will begin flashing to indicate pairing mode.
In the app, tap Continue to proceed.
Select your xPad+ from the list of available devices to complete the pairing process.
Close the battery compartment cover securely
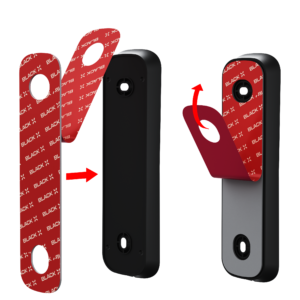
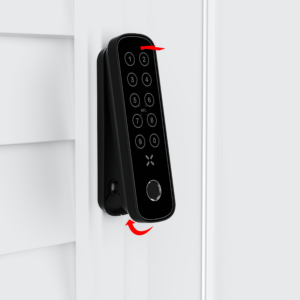
Step 5: Secure the xPad+ to the Surface
Option 1
Choose a suitable location for installing the xPad+, ensuring it is within 10 feet (3 meters) of the lock. Prepare two screws and a Phillips head screwdriver.
Position the back cover of the xPad+ on the surface and secure it by inserting the screws into the two designated holes.
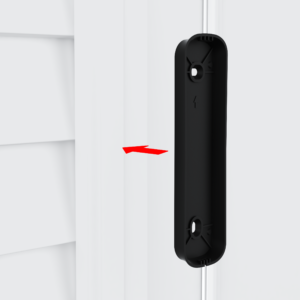
Slide the xPad+ into the back cover and ensure it is securely in place.
Step 5: Secure the xPad+ to the Surface
Option 2
Choose a suitable location for installing the xPad+, ensuring it is within 10 feet (3 meters) of the lock for standard doors. Note: For steel doors, it is recommended to attach the xPad+ as close to the door and lock as possible to ensure optimal Bluetooth connectivity.
Peel off the backing from one side of the 3M adhesive pad.
Carefully place the adhesive pad on the back cover of the xPad+, ensuring proper alignment.
Peel off the backing from the other side of the adhesive pad.
Stick the back cover of the xPad+ to the chosen position on the surface.
Slide the xPad+ into the back cover and ensure it is securely in place.
Congratulations! You have successfully completed all the installation steps for your xPad+. You can now configure the unlocking methods.
Set Up Unlocking Methods and Test Functionality
Unlock your door with the BLACK X xPad+ using one of the following methods: passcode, fingerprint, or NFC for seamless entry.
Setting up a Passcode
Open the BLACK X app.
Go to the Main Menu.
Select Keypad passcode.
Choose the desired lock for approval.
Click Generate Code.
From the top bar, select the desired period length. You can also choose “Custom” to manually create a code.
Enter the required information.
Click Set a Passcode to complete the configuration.
Once the code is generated, you can choose to notify the user via SMS or Email by entering their contact details or click complete to finish.
Please note: The passcode must be used for the first time within 24 hours.
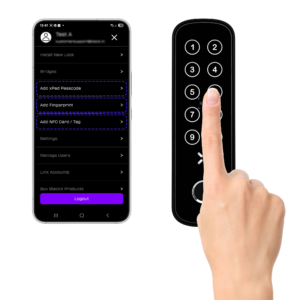
Setting up a Fingerprint
Open the BLACK X app.
Go to the Main Menu and select “add Fingerprint”.
Select the lock you want to add the fingerprint to.
Tap “add fingerprint”.
choose the access period from the top bar and fill in the required details.
Tap “add fingerprint”.
Activate the xPad+ by pressing any numeric key. When the X key lights up, tap “Continue.”
place your finger on the sensor 4 times, lifting after each scan until the process is complete. The progress of the scan can be seen in the app.
If the fingerprint scan is successful, the user will be added to the list. If the pairing fails, an error message will appear.
Pairing NFC Card or Tag
Open the BLACK X app.
Go to the Main Menu.
Select Add NFC Card/tag.
Choose the desired lock for approval.
Click Add NFC Card/tag.
From the top bar, select the desired period length and enter the required information.
Click Add NFC Card/tag to start the pairing.
Once the prompted screen appears, hold the NFC card or Tag close to the card reader area on the xPad+.
The xPad+ will emit a beep once the Card/Tag is detected. Please wait a few seconds for a second beep from the lock. If the pairing is successful, the user will appear on the list. If the pairing fails, an error message will be shown – please try again.
🎥 Prefer a visual guide?
Watch our full tutorial below, or visit our YouTube channel for more walkthroughs
BLACK X Smart Bike Lock – Important Usage Information
Locking instructions:
Ensure the locking arm is fully and correctly inserted into the lock body – whether foldable or
rigid. Then, turn the knob counterclockwise to engage the lock securely.
Smart Access
Unlock the lock via the app or xKey – once access is granted, the lock remains engaged for a set duration (default: 6 seconds).
After this period, it automatically returns to neutral mode, disengaging the external knob to prevent further entry.
Mechanical Access Key Instructions
Insert the physical key into the cylinder and turn
it clockwise. Once engaged, rotate
BLACK X Smart Lock – Essential Usage Information
Manual Locking & Unlocking:
Inside: Turn the knob manually, just like a standard thumb-turn cylinder.
Outside: Rotate the knob to lock the door.
Smart Access:
When unlocking using the app, xKey, keypad, fingerprint, NFC, or remote access, the lock remains engaged for the preset duration (default: 6 seconds). After this period, the lock returns to neutral mode, disengaging the outside knob, which prevents it from being turned to open the door.
Mechanical Access:
To use the Mechanical Access Key, insert it while holding the knob, then rotate the key clockwise, followed by the knob.
To remove the key, turn it counterclockwise while holding the knob, then pull it out.
xPad: Step-by-Step Installation Guide
Follow these simple steps to set up your xPad quickly and efficiently. Ensure all components are ready before starting the installation process.
Step 1: Unbox and Prepare Components
Open the package and identify all components. Lay them out for easy access.
The package includes:
1 x xPad
1 x 3M adhesive pad
1 x Keypad ejector tool
2 x Screws
2 x AAA Batteries
Step 2: Remove the Back Cover of the xPad
Using the Keypad ejector tool, remove the back cover of the xPad by inserting the pin into the designated hole at the bottom of the device
Step 3: Place the batteries
Open the battery compartment cover.
Insert the batteries, ensuring they are correctly positioned. The xPad will power on and emit a beep to confirm proper installation.
Step 4: Pair the xPad with the BLACK X app
Open the BLACK X App, navigate to the lock you wish to pair with the xPad, and tap the Settings button.
In the Settings menu, select Keypad, then tap Add Keypad.
On the xPad, locate the Pairing Key in the small hole just above the battery compartment, where the batteries are installed. Use the Keypad ejector tool to press the Pairing Key button. The xPad will begin flashing to indicate pairing mode.
In the app, tap Continue to proceed.
Select your xPad from the list of available devices to complete the pairing process.
Close the battery compartment cover securely
Step 5: Secure the xPad to the Surface
Option 1
Choose a suitable location for installing the xPad, ensuring it is within 10 feet (3 meters) of the lock. Prepare two screws and a Phillips head screwdriver.
Position the back cover of the xPad on the surface and secure it by inserting the screws into the two designated holes.
Slide the xPad into the back cover and ensure it is securely in place.
Step 5: Secure the xPad to the Surface
Option 2
Choose a suitable location for installing the xPad, ensuring it is within 10 feet (3 meters) of the lock for standard doors. Note: For steel doors, it is recommended to attach the xPad as close to the door and lock as possible to ensure optimal Bluetooth connectivity.
Peel off the backing from one side of the 3M adhesive pad.
Carefully place the adhesive pad on the back cover of the xPad, ensuring proper alignment.
Peel off the backing from the other side of the adhesive pad.
Stick the back cover of the xPad to the chosen position on the surface.
Slide the xPad into the back cover and ensure it is securely in place.
Setting up a Passcode
Open the BLACK X app.
Go to the Main Menu.
Select Keypad passcode.
Choose the desired lock for approval.
Click Generate Code.
From the top bar, select the desired period length. You can also choose “Custom” to manually create a code.
Enter the required information.
Click Set a Passcode to complete the configuration.
Once the code is generated, you can choose to notify the user via SMS or Email by entering their contact details or click complete to finish.
Please note: The passcode must be used for the first time within 24 hours.
Congratulations! You have successfully completed all the installation steps for your xPad.
🎥 Looking for a clearer walkthrough? Watch our step-by-step video tutorials below!
Mechanical Access Key guide
How to Use the Mechanical Access Key?
Firmly hold the knob to prevent it from rotating.
Insert the key into the keyhole.
While holding the knob, turn the key clockwise.
Rotate the knob clockwise to open the door.
To remove the key, hold the knob, turn the key counterclockwise, and pull it out.
Need a clearer walkthrough? Check out our step-by-step videos below for:
BLACK X Euro Profile Smart Lock
BLACK X USA Deadbolt Lock
XPad+ Features
Refined Access at Your Fingertips:
The xPad+ goes beyond traditional keypads by introducing a suite of advanced features that blend seamlessly with its sleek design. From code-based entry to biometric verification, the xPad+ ensures that only authorized individuals can access your space, providing peace of mind with a touch of modernity.
Custom Code-Based Keypad Entry:
Like its predecessor, the xPad+, enhances property security with a keypad for custom codes, allowing for easy management and adaptation over time. Its intuitive design ensures effortless entry for guests, family, and service personnel, with the added flexibility of changing codes to meet your evolving security needs.
Biometric Fingerprint Recognition:
Elevating security to a personal level, the xPad+ incorporates state-of-the-art fingerprint recognition, allowing quick, secure access with just a touch. This biometric feature enhances the convenience introduced by the xPad, making entry as simple as a single touch without compromising security.
NFC and Bluetooth Low Energy (BLE) Connectivity:
Embracing the future of wireless access, the xPad+ features NFC for contactless entry and BLE for remote access via smartphones. These features provide seamless and secure ways to access your premises, reflecting the dynamic needs of modern environments.
Enhanced Security with Uncompromised Elegance:
The xPad+ is designed to be both robust and elegant, featuring a weatherproof build and LED backlighting for clear visibility in any condition. Its long battery life and easy installation options, including discreet mounting choices, ensure that the xPad+ is not only a sophisticated addition to your security setup but also a convenient one.
Capacitive Touch Surface and IP65 Rating:
Continuing the legacy of the xPad, the xPad+ features a capacitive touch surface for precise input and an IP65 rating for exceptional durability against the elements.
Extended Connectivity and Easy Installation:
With Bluetooth LE 5.0 technology, the xPad+ offers extended connectivity range. Its flexible installation options, including screws and adhesive strip, make it compatible with various settings, ensuring that your security upgrade is as straightforward as it is stylish.
A Leap Towards Future-Proof Security:
The xPad+ represents the pinnacle of access control solutions, offering a comprehensive set of features that cater to the needs of today’s security-conscious environments. Whether you’re enhancing your home or upgrading your business’s access system, the xPad+ combines the best of technology, security, and design to offer an unparalleled experience.
XPad+ Overview
Elevate your security and convenience with the xPad+, the next generation in our line of trusted access solutions. Crafted with precision and designed for sophistication, the xPad+ is more than an upgrade; it’s a revolution in access control, offering both traditional and innovative ways to secure your premises.
XPad Key Features
Key Features:
Capacitive touch surface for quick and precise input
IP65 rating for dust and water resistance, guaranteeing durability against the elements.
Long battery life of up to two years, powered by
2 AAA batteries (included)
Utilizes Bluetooth LE 5.0 technology, offering a connectivity range of up to 30 feet (10m)
Easy installation with either 2 wall screws or 1 adhesive strip included, providing flexible mounting options.
Compatible with Black X UK/EU or USA model variants
XPad Overview
The Black xPad revolutionizes your lock with key code access for enhanced security and convenience. This elegantly crafted keypad allows for effortless entry by guests without the necessity of a smartphone or physical keys. Through the Black X App, you can issue both unique temporary and permanent access codes to acquaintances, family, and service personnel such as renters, dog walkers, cleaners, and contractors, ensuring they can access your home with ease, even in the absence of the app. Our advanced AI eKey technology facilitates the generation and distribution of these secure, one-time or ongoing access codes, providing a blend of convenience, security, and peace of mind.
The keypad is designed with LED backlighting for clear visibility of key codes under any lighting conditions. Its wireless and weatherproof design allows for discreet installation near your lock, ensuring optimal convenience without sacrificing style.